Storage Accelerated Copy
Storage Accelerated Copy is an advanced data copy method that leverages storage array level XCOPY operations to dramatically improve migration performance. Instead of copying data over the network via the traditional NBD/NFC protocol, this method offloads the data copy to the storage array itself, achieving significantly faster transfer speeds.
Overview
How It Works
Traditional vJailbreak migrations copy VM disk data from VMware ESXi hosts to PCD Cinder volumes over the network using the NFC (Network File Copy) protocol. This approach is limited to approximately 1 Gbps per VMDK due to VMware’s NFC protocol constraints.
Storage-Accelerated Copy bypasses this limitation by:
- Creating a target volume directly on the storage array
- Importing the volume into PCD Cinder
- Mapping the volume to the ESXi host
- Using ESXi’s
vmkfstoolsto perform an XCOPY clone operation directly on the storage array - The storage array handles the data copy internally.
Benefits
- Dramatically faster migrations: Array-level copy operations are significantly faster than network-based transfers
- Reduced network load: Data doesn’t traverse the network between VMware and PCD.
- Lower ESXi host CPU usage: The storage array handles the heavy lifting
- Ideal for large VMs: Especially beneficial for VMs with large disks (hundreds of GB to TB)
Requirements
- Supported storage arrays: Pure Storage FlashArray or NetApp ONTAP
- Shared storage: Both VMware datastores and PCD must be backed by the same storage array.
- ESXi SSH access: SSH access to ESXi hosts with root privileges
- iSCSI connectivity: ESXi hosts must have iSCSI initiators configured to the storage array
Supported Storage Arrays
| Vendor | Product |
|---|---|
| Pure Storage | FlashArray |
| NetApp | ONTAP |
Prerequisites
Before using Storage-Accelerated Copy, ensure the following prerequisites are met:
1. Storage Array Configuration
- Storage array must be accessible from both VMware ESXi hosts and PCD compute nodes
- VMware datastores must be VMFS volumes backed by LUNs on the supported storage array
- PCD Cinder must be configured with a backend driver for the same storage array
- Cinder volume types must be created and mapped to the storage array backend
2. ESXi SSH Access
Storage-Accelerated Copy requires SSH access to ESXi hosts to execute vmkfstools commands. Follow these steps to set up SSH access:
Step 1: Enable SSH on ESXi Hosts
Option A: Using vSphere Client (GUI)
- Log in to vSphere Client
- Navigate to the ESXi host
- Click on the Configure tab
- Under System, select Services
- Find SSH in the list of services
- Right-click on SSH and select Start
- (Optional) Right-click again and select Policy → Start and stop with host to enable SSH automatically on boot
Option B: Using ESXi Host Client (Direct)
- Log in to the ESXi host directly via web browser:
https://<esxi-host-ip> - Navigate to Host → Actions → Services → Enable Secure Shell (SSH)
Option C: Using ESXi Shell (Console)
- Access the ESXi host console (physical or via iLO/iDRAC)
- Press
F2to customize system/view logs - Log in with root credentials
- Navigate to Troubleshooting Options
- Select Enable SSH
- Press
Enterto confirm
Step 2: Generate SSH Key Pair
On your workstation or the vJailbreak VM, generate an SSH key pair:
# Generate RSA key pair (recommended for ESXi compatibility)ssh-keygen -t rsa -b 4096 -f ~/.ssh/esxi_migration_key -C "vjailbreak-migration"
# When prompted:# - Enter passphrase: Leave empty (press Enter) for passwordless authentication# - Confirm passphrase: Press Enter again
This will create two files:
~/.ssh/esxi_migration_key- Private key (keep this secure)~/.ssh/esxi_migration_key.pub- Public key (to be copied to ESXi)
Step 3: Copy Public Key to ESXi Hosts
Option A: Using ssh-copy-id (Easiest)
# Copy public key to ESXi hostssh-copy-id -i ~/.ssh/esxi_migration_key.pub root@<esxi-host-ip>
# Enter the root password when prompted
Option B: Manual Copy
If ssh-copy-id is not available:
# Display the public keycat ~/.ssh/esxi_migration_key.pub
# SSH into the ESXi hostssh root@<esxi-host-ip>
# On the ESXi host, add the public key to authorized_keyscat >> /etc/ssh/keys-root/authorized_keys << 'EOF'ssh-rsa AAAAB3NzaC1yc2EAAAADAQABAAACAQC... vjailbreak-migrationEOF
# Set correct permissionschmod 600 /etc/ssh/keys-root/authorized_keys
Step 4: Test SSH Connection
Verify passwordless SSH access works:
# Test SSH connection (should not prompt for password)ssh -i ~/.ssh/esxi_migration_key root@<esxi-host-ip>If successful, you should be able to login to esxi.
Step 5: Configure SSH Key in vJailbreak
- Navigate to Storage Management page
- At the top, find the ESXi SSH Key section
- Click Configure
- Get your private key contents:
Terminal window cat ~/.ssh/esxi_migration_key - Copy the entire output (including
-----BEGIN OPENSSH PRIVATE KEY-----and-----END OPENSSH PRIVATE KEY-----) - Paste into the UI textarea
- Click Save
Step 6: Repeat for All ESXi Hosts
Repeat Steps 3-4 for all ESXi hosts in your vCenter cluster that host VMs you plan to migrate. The same SSH key pair can be used for all hosts.
# Example: Copy to multiple hostsfor host in esxi-host1.example.com esxi-host2.example.com esxi-host3.example.com; do echo "Configuring $host..." ssh-copy-id -i ~/.ssh/esxi_migration_key.pub root@$hostdone3. Network Connectivity
| Source | Destination | Port | Protocol | Purpose |
|---|---|---|---|---|
| vJailbreak | ESXi hosts | 22 | TCP | SSH for vmkfstools commands |
| ESXi hosts | Storage array | 3260 | TCP | iSCSI (if using iSCSI) |
| ESXi hosts | Storage array | Various | FC | Fibre Channel (if using FC) |
| vJailbreak | Storage array | 443 | TCP | Storage array API |
Configuration
Understanding Auto-Discovery
When you add PCD credentials to vJailbreak, the system automatically discovers all storage volume backends configured in your PCD environment. For each detected storage backend (NetApp, Pure Storage, etc.), vJailbreak creates a placeholder ArrayCreds entry with status “Auto-discovered” and credentials marked as “Pending”.
How Auto-Discovery Works
-
PCD Configuration: In PCD, you configure multiple storage volume backends under “Persistent Storage Connectivity” (Cluster Blueprint → Storage). Each volume backend represents a storage array with its driver type (NetApp Data ONTAP, Pure Storage iSCSI, NFS, etc.).
-
Backend Detection: When PCD credentials are added to vJailbreak, the system queries the Cinder API to discover all configured volume backends and their properties:
- Volume Type (e.g.,
netapp,vt-pure-iscsi) - Backend Name (e.g.,
netapp,pure-iscsi-1) - Driver Type (e.g.,
NetApp Data ONTAP,Pure Storage iSCSI) - Cinder Host string
- Volume Type (e.g.,
-
Placeholder Creation: For each discovered backend, vJailbreak automatically creates an ArrayCreds resource with:
- Name: Derived from the volume type and backend name (e.g.,
netapp-netapp,vt-pure-iscsi-pure-iscsi-1) - Vendor: Automatically identified from the driver type
- Source: Marked as “Auto-discovered”
- Credentials: Status shows “Pending” (requires user input)
- PCD Mapping: Pre-populated with volume type, backend name, and Cinder host
- Name: Derived from the volume type and backend name (e.g.,
-
User Completion: Users then update these auto-discovered entries with the actual storage array credentials (hostname, username, password) to enable Storage Accelerated Copy.
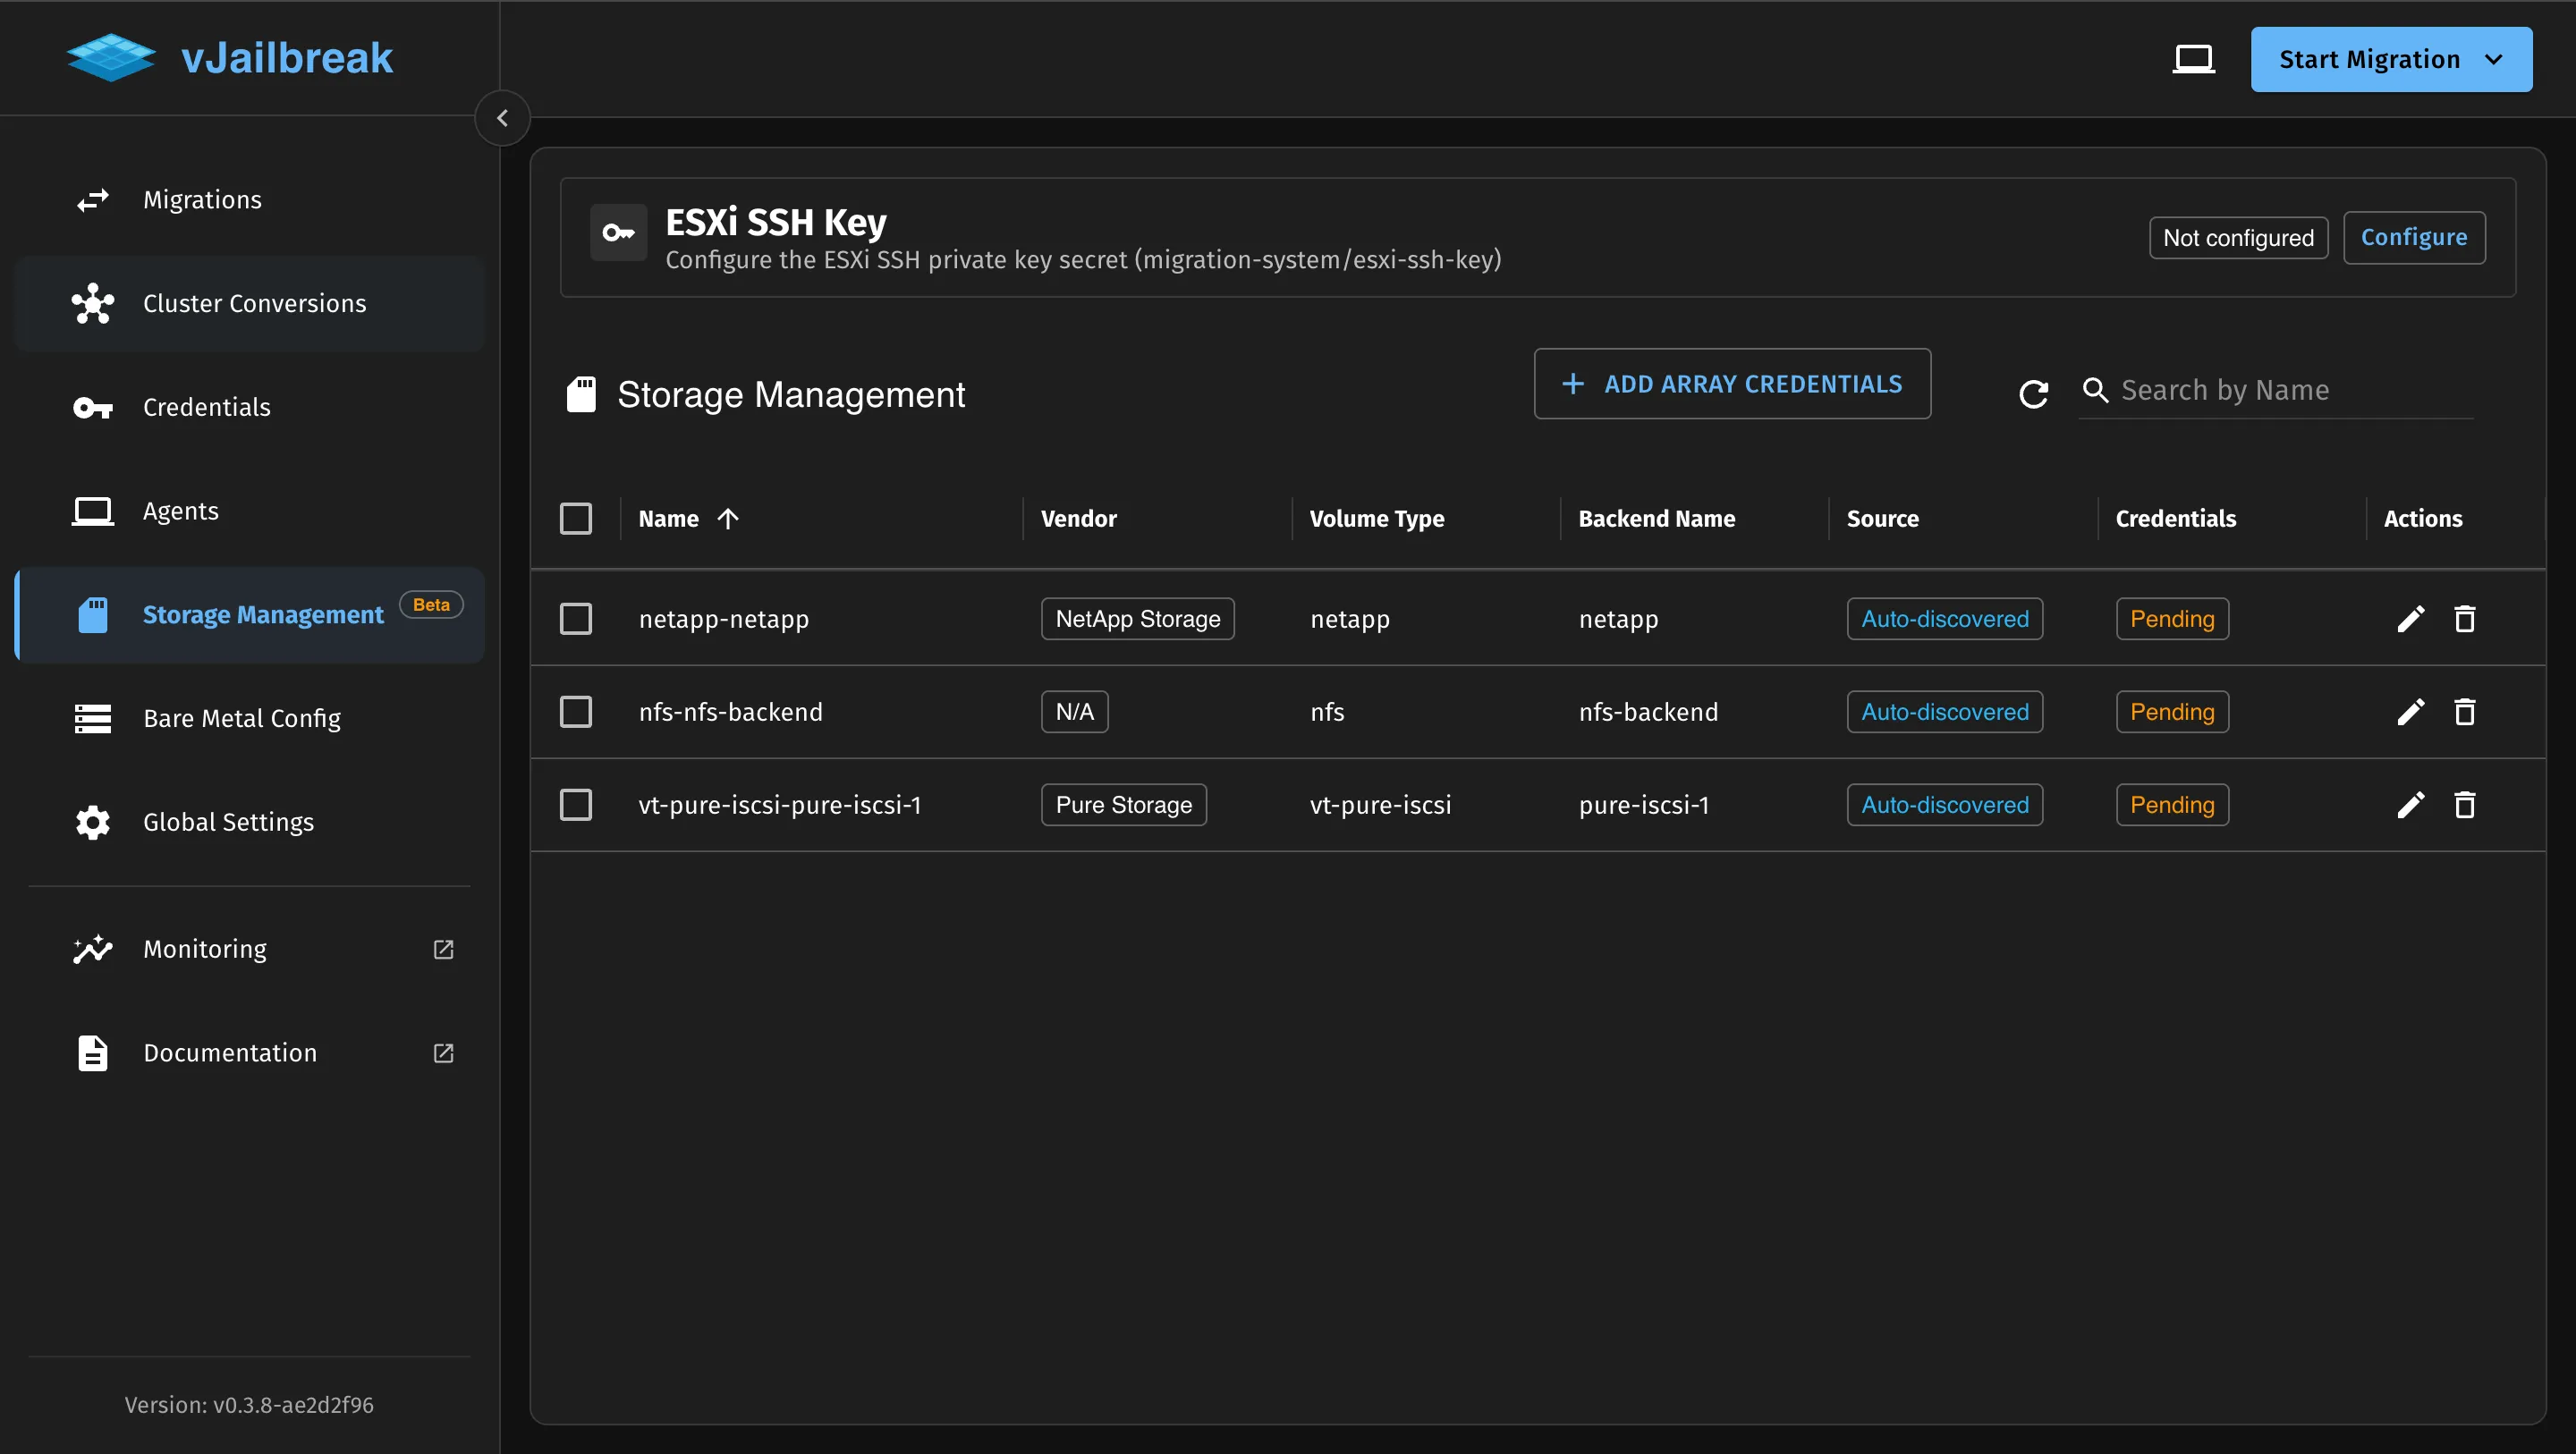
Storage Management Page
The Storage Management page displays all auto-discovered storage backends:
| Column | Description |
|---|---|
| Name | Auto-generated name based on volume type and backend |
| Vendor | Storage array vendor (NetApp Storage, Pure Storage, N/A) |
| Volume Type | Cinder volume type name |
| Backend Name | Cinder backend name from configuration |
| Source | ”Auto-discovered” for automatically detected backends |
| Credentials | ”Pending” until user provides array credentials |
| Actions | Edit (to add credentials) and Delete |
Example: PCD with Multiple Storage Backends
In PCD, storage backends are configured in the Cluster Blueprint under Persistent Storage Connectivity. Each volume backend can have multiple configurations, and each configuration represents a connection to a storage array.
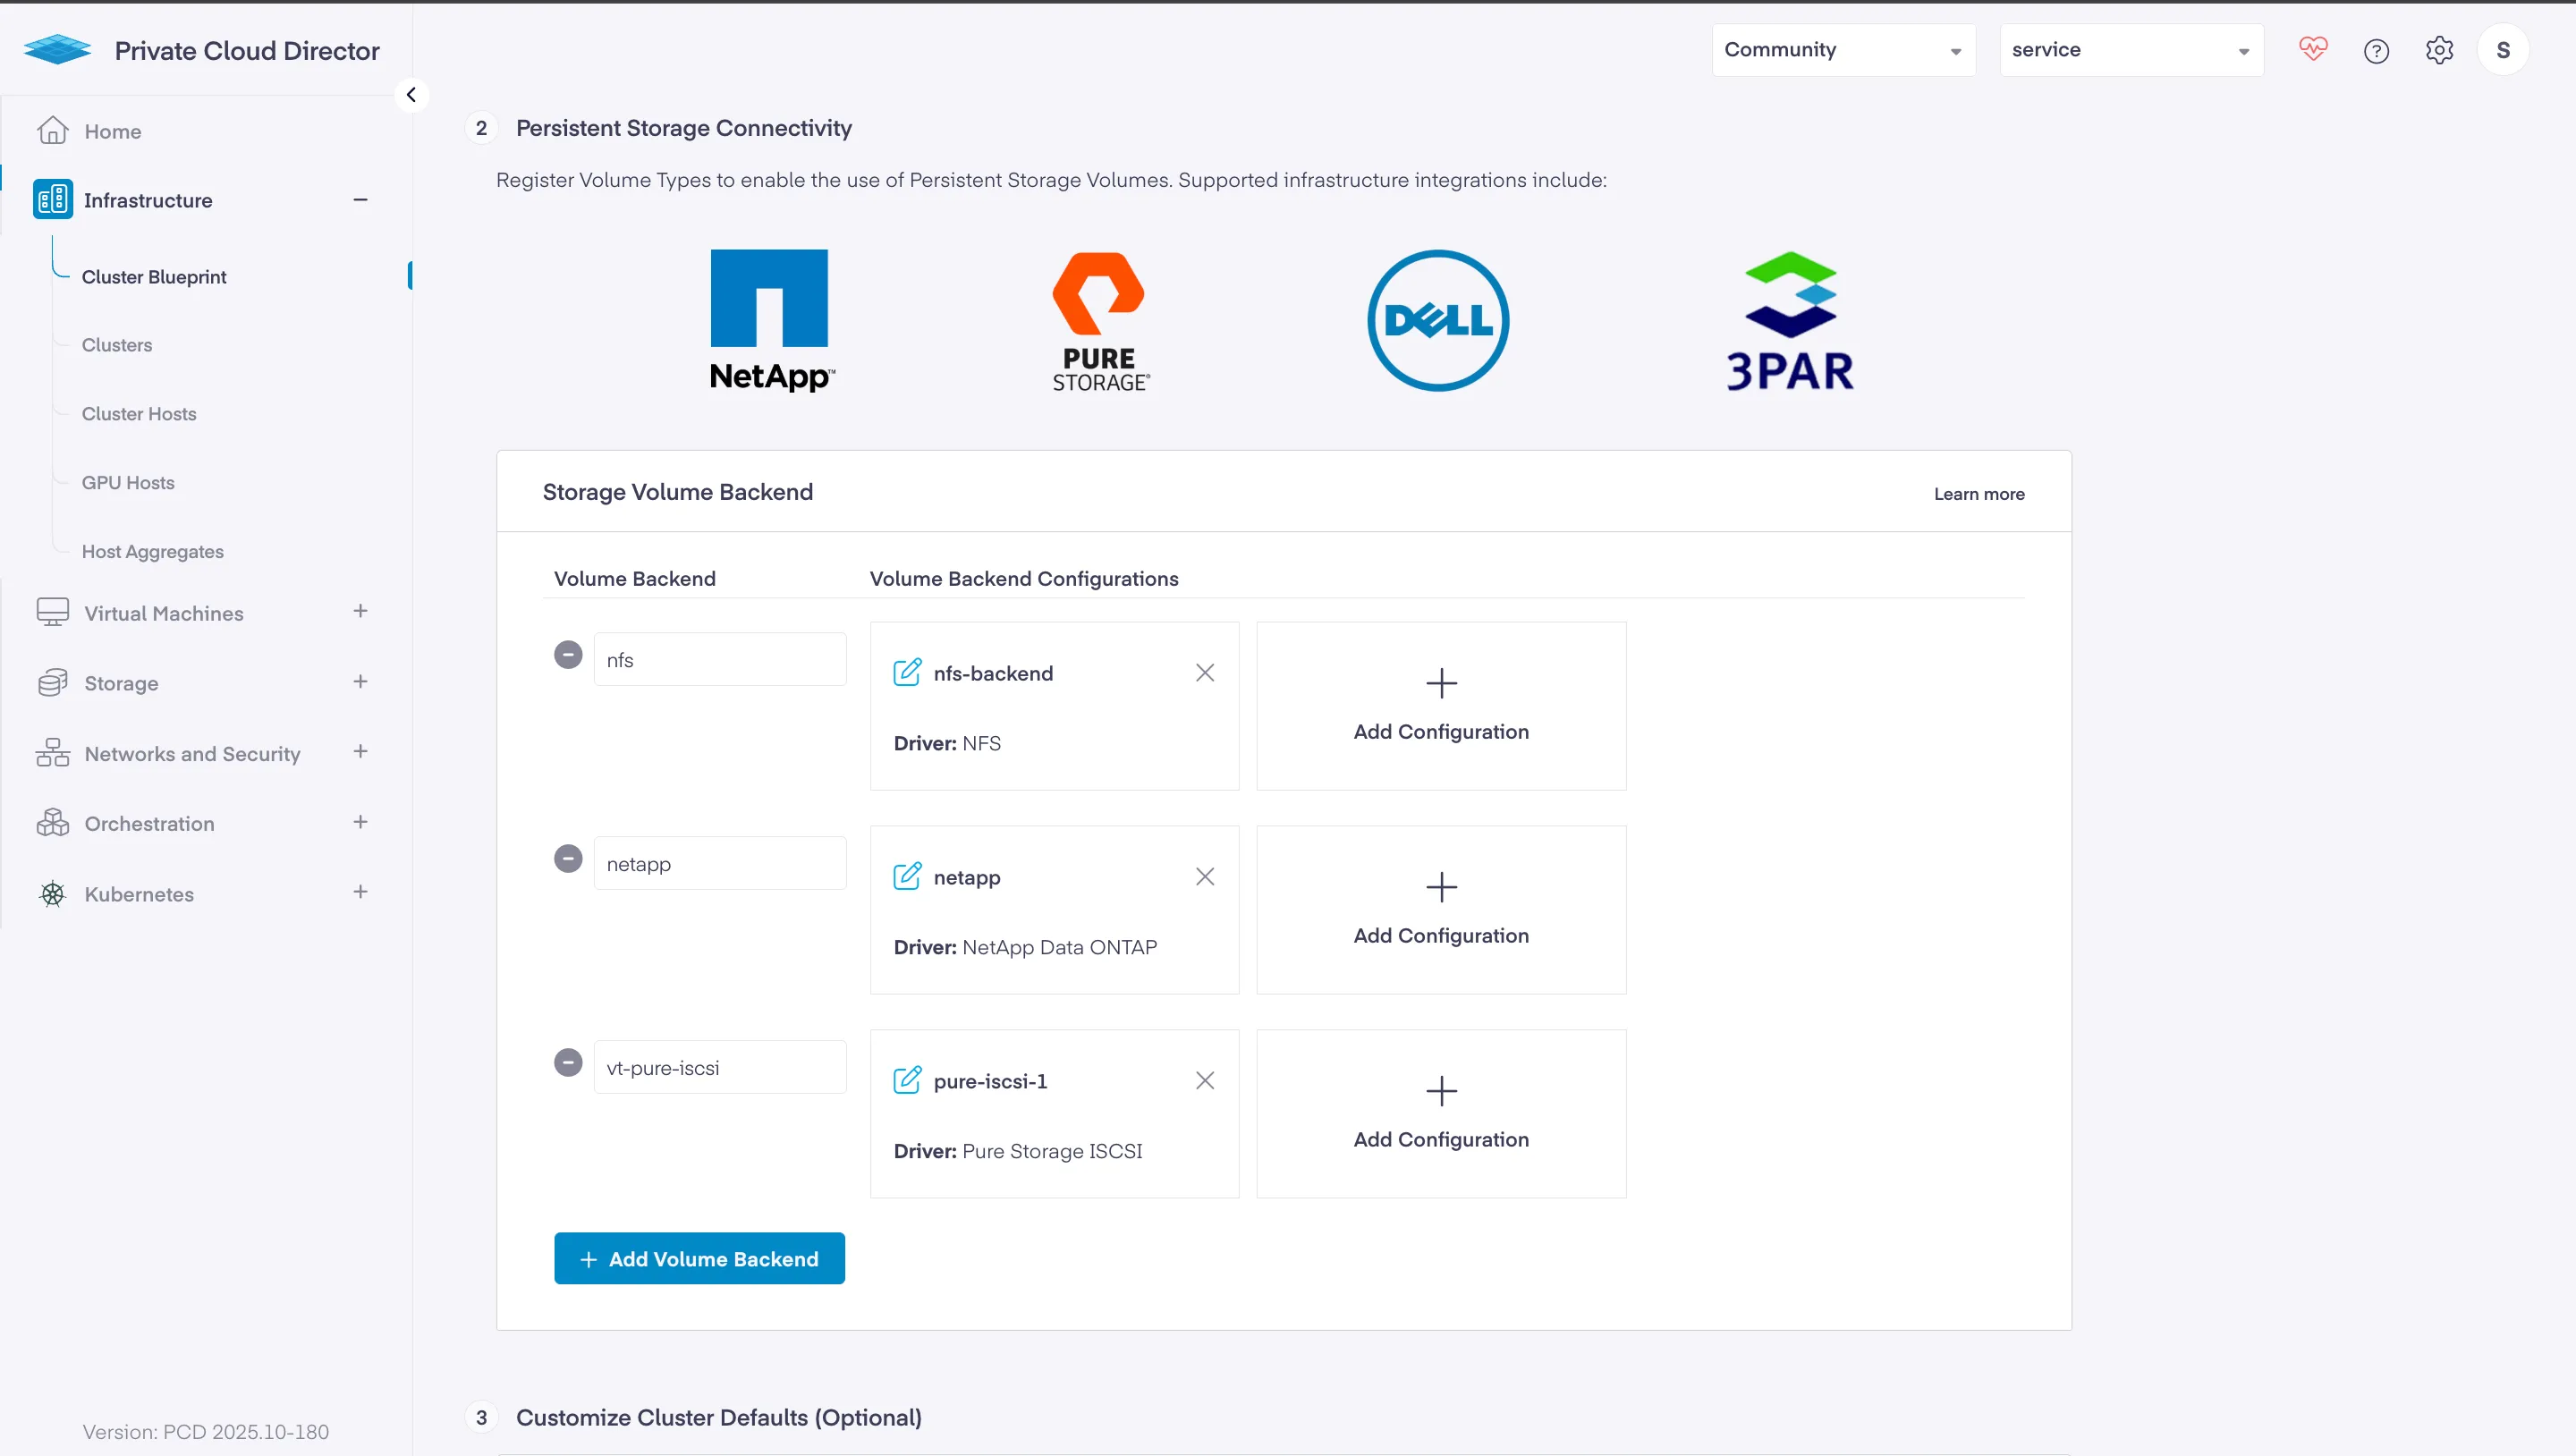
In the example above, PCD has three volume backends configured:
- nfs - NFS backend with driver “NFS”
- netapp - NetApp backend with driver “NetApp Data ONTAP”
- vt-pure-iscsi - Pure Storage backend with driver “Pure Storage iSCSI”
Each backend can have multiple configurations (shown as “Volume Backend Configurations” with the + button). For example:
- The
nfsvolume backend might have one configuration namednfs-backend - The
netappvolume backend might have one configuration namednetapp - The
vt-pure-iscsivolume backend might have multiple configurations:pure-iscsi-1,pure-iscsi-2, etc.
Important: For each volume type, you can configure multiple storage arrays. This is useful when you have multiple Pure Storage or NetApp arrays in your environment, each serving different datastores.
Storage Volume Backend Configuration (Example):├── nfs (Volume Type)│ └── nfs-backend (Backend Configuration)│ ├── Driver: NFS│ └── Backend Name: nfs-backend├── netapp (Volume Type)│ └── netapp (Backend Configuration)│ ├── Driver: NetApp Data ONTAP│ └── Backend Name: netapp└── vt-pure-iscsi (Volume Type) ├── pure-iscsi-1 (Backend Configuration #1) │ ├── Driver: Pure Storage iSCSI │ └── Backend Name: pure-iscsi-1 └── pure-iscsi-2 (Backend Configuration #2) ├── Driver: Pure Storage iSCSI └── Backend Name: pure-iscsi-2After adding PCD credentials to vJailbreak, the system automatically creates ArrayCreds placeholders for each backend configuration:
nfs-nfs-backend(Vendor: N/A, Credentials: Pending) - Cannot be used for Storage Accelerated Copynetapp-netapp(Vendor: NetApp Storage, Credentials: Pending)vt-pure-iscsi-pure-iscsi-1(Vendor: Pure Storage, Credentials: Pending)vt-pure-iscsi-pure-iscsi-2(Vendor: Pure Storage, Credentials: Pending)
Using the UI
Storage-Accelerated Copy can be configured entirely through the vJailbreak UI with automatic backend discovery:
Step 1: Add PCD Credentials
If not already done:
- Navigate to Credentials → PCD/OpenStack
- Add your PCD credentials
- vJailbreak will automatically discover all storage volume backends configured in PCD
Step 2: Configure Storage Array Credentials
-
Navigate to Storage Management (Beta feature)
-
You’ll see auto-discovered entries for each PCD storage backend:
- Name: Auto-generated (e.g.,
netapp-netapp,vt-pure-iscsi-pure-iscsi-1) - Vendor: Auto-identified from driver type
- Volume Type: Pre-populated from PCD configuration
- Backend Name: Pre-populated from PCD configuration
- Source: “Auto-discovered”
- Credentials: “Pending” (requires your input)
- Name: Auto-generated (e.g.,
-
Click the Edit icon for a storage array entry
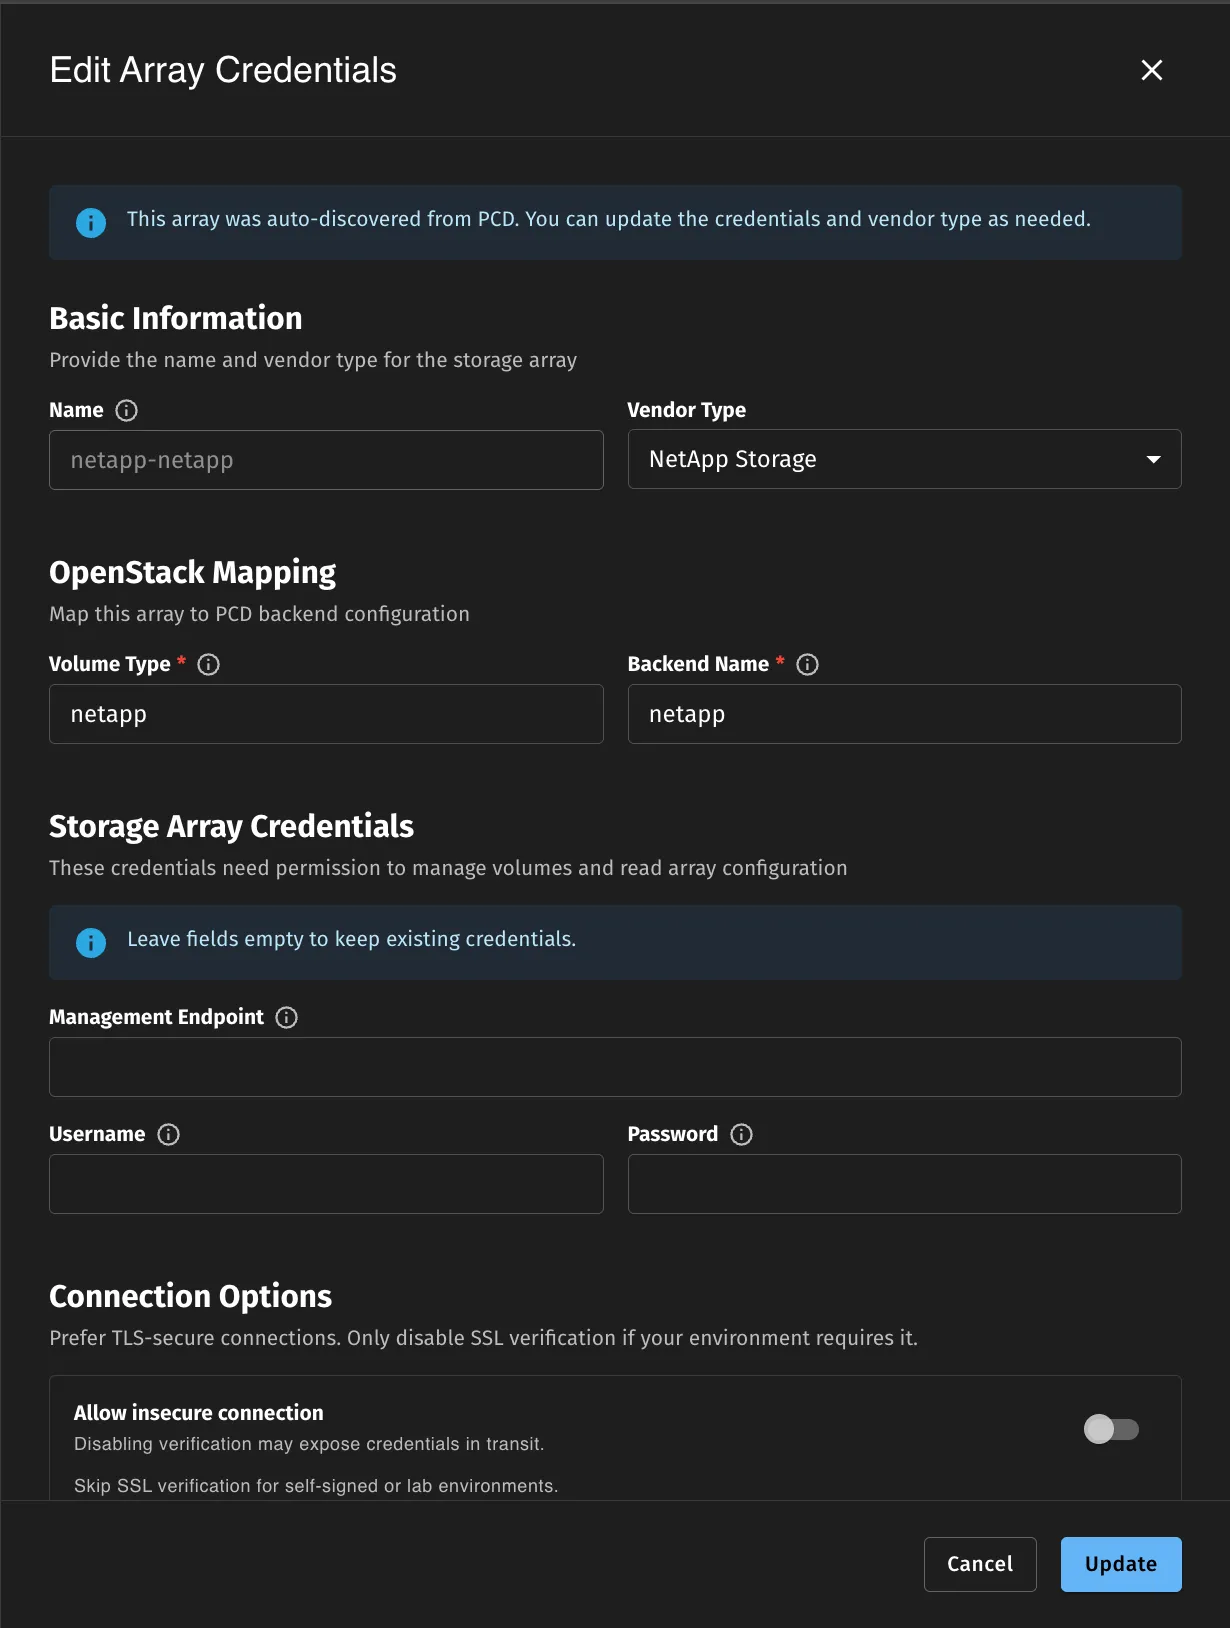
- Fill in the storage array credentials:
- Hostname/IP: Storage array management IP address
- Username: Array administrator username
- Password: Array administrator password
- Skip SSL Verification: Enable for testing environments (disable in production)
- Click Save
- The system will:
- Validate the credentials
- Connect to the storage array
- Auto-discover VMware datastores backed by this array
- Update the status to show validation results
Step 3: Configure ESXi SSH Key
- At the top of the Storage Management page, find the ESXi SSH Key section
- Click Configure if not already configured
- Paste your ESXi SSH private key (see ESXi SSH Access section for key generation steps)
- Click Save
Step 4: Create Migration with Storage-Accelerated Copy
- When creating a migration plan, select Storage-Accelerated Copy as the storage copy method
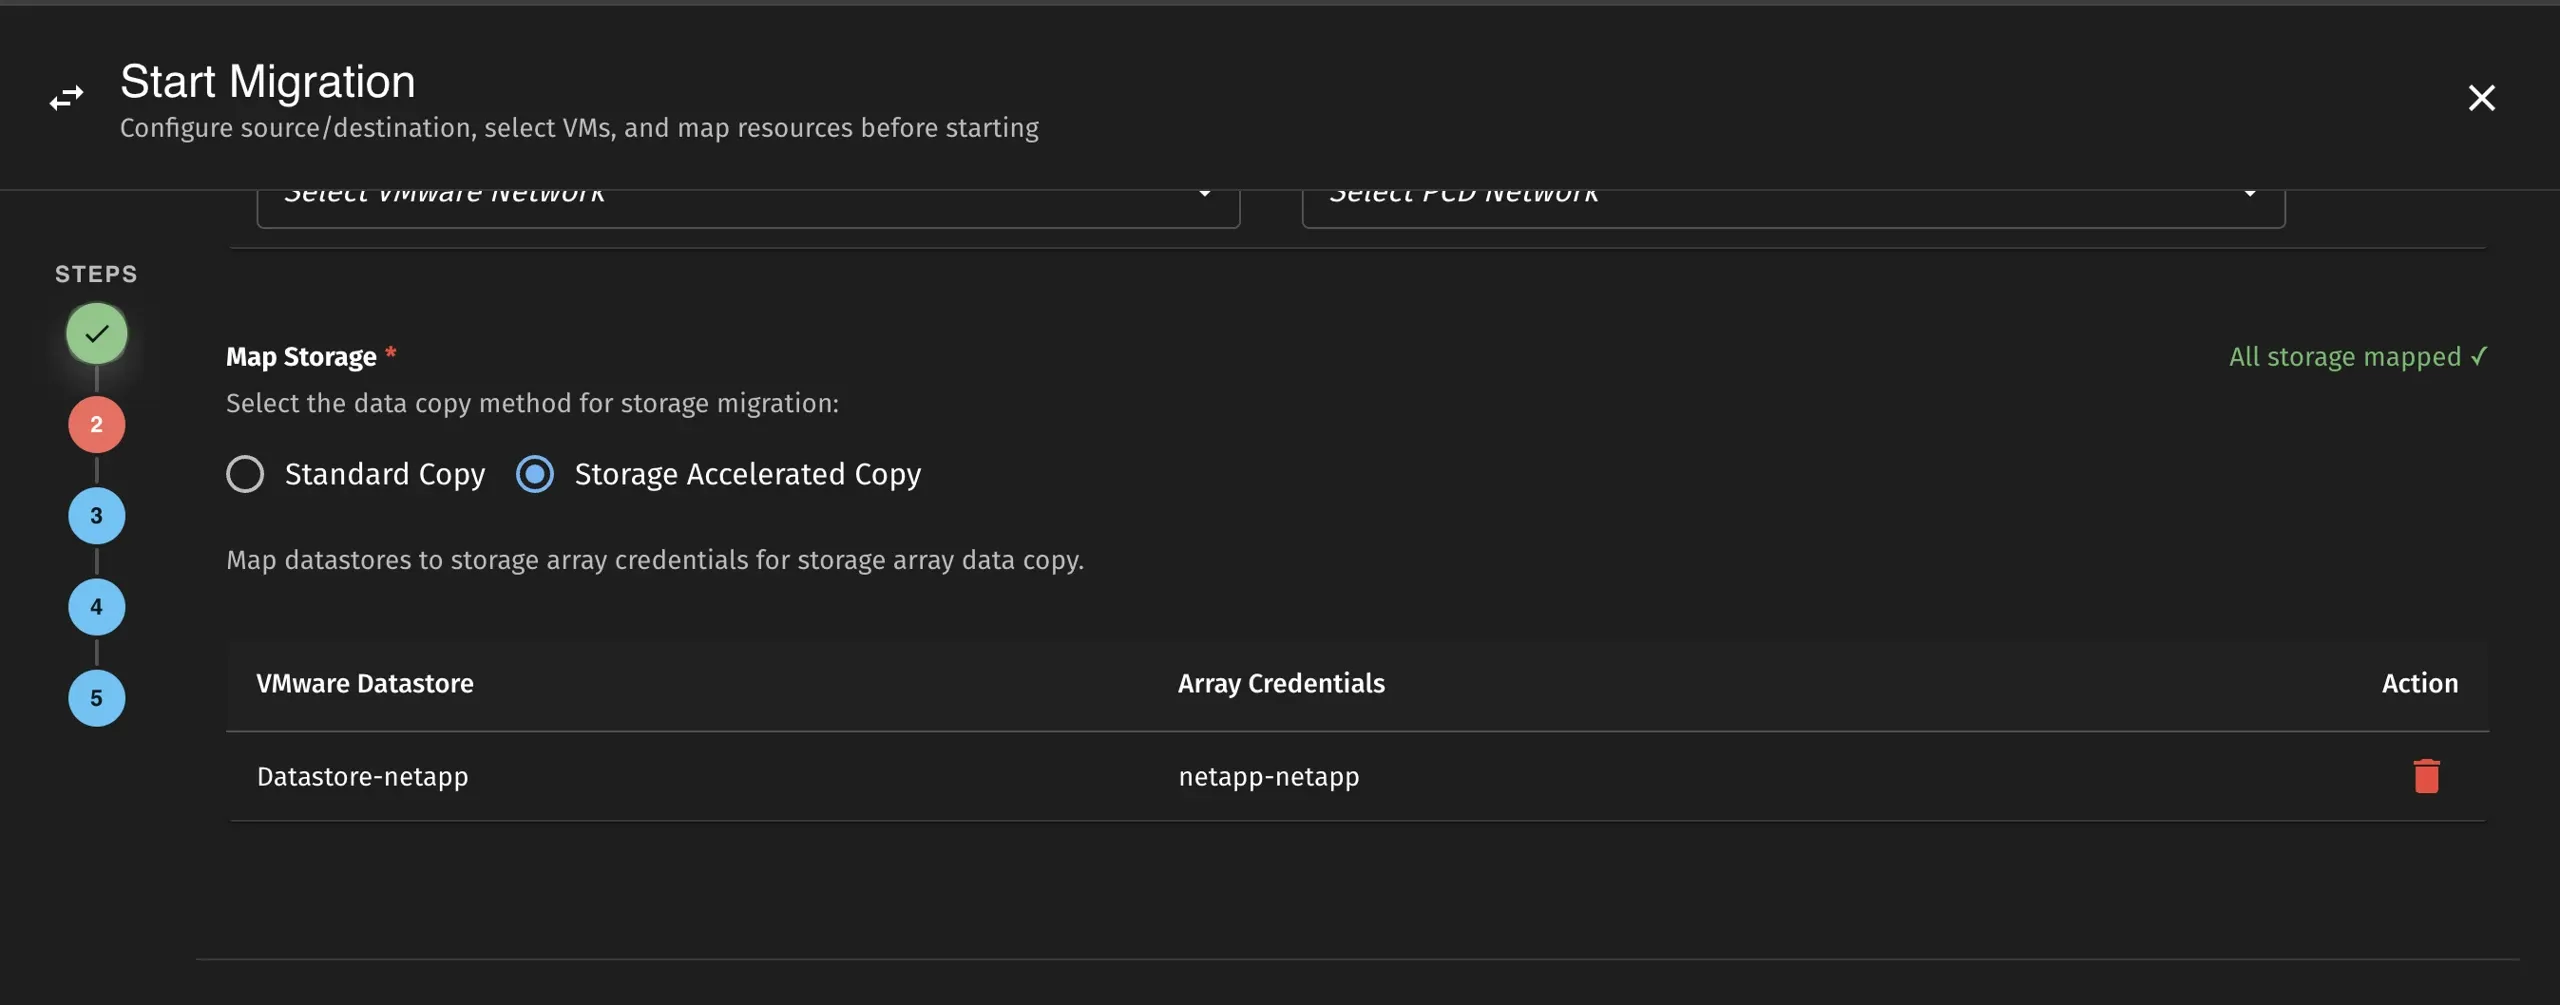
- The UI will automatically map datastores to ArrayCreds if everything is configured correctly
- Start the migration - it will use array-level XCOPY for data transfer
Migration Workflow
When Storage-Accelerated Copy is enabled, the migration follows this workflow:
┌─────────────────────────────────────────────────────────────────┐│ Storage-Accelerated Copy Flow │├─────────────────────────────────────────────────────────────────┤│ ││ 1. Validate Prerequisites ││ ├── Storage provider credentials ││ ├── ESXi SSH key ││ └── Array connectivity ││ ││ 2. Connect to ESXi Host via SSH ││ ││ 3. Power Off Source VM (required for XCOPY) ││ ││ 4. For Each Disk: ││ ├── Create target volume on storage array ││ ├── Import volume to Cinder (manage existing) ││ ├── Create/update initiator group with ESXi IQN ││ ├── Map volume to ESXi host ││ ├── Rescan ESXi storage adapters ││ ├── Wait for target device to appear ││ ├── Execute vmkfstools XCOPY clone ││ └── Monitor clone progress ││ ││ 5. Convert Volumes (same as normal migration) ││ ││ 6. Create Target VM in PCD ││ │└─────────────────────────────────────────────────────────────────┘Migration Phases
When using Storage-Accelerated Copy, you’ll see these additional migration phases:
| Phase | Description |
|---|---|
ConnectingToESXi | Establishing SSH connection to ESXi host |
CreatingInitiatorGroup | Creating/updating initiator group on storage array |
CreatingVolume | Creating target volume on storage array |
ImportingToCinder | Importing volume to PCD Cinder |
MappingVolume | Mapping volume to ESXi host |
RescanningStorage | Rescanning ESXi storage adapters |
StorageAcceleratedCopyInProgress | XCOPY clone operation in progress |
Limitations
- Cold migration only: VMs must be powered off during the copy operation (no live migration support)
- Shared storage required: Source and destination must be on the same storage array
- VMFS datastores only: NFS datastores are not supported
- No CBT support: Change Block Tracking is not used; full disk copy is performed
- Single array per datastore: Each datastore can only be mapped to one ArrayCreds
Troubleshooting
Common Issues
ESXi SSH Connection Failed
Error: failed to connect to ESXi via SSHResolution:
- Verify SSH is enabled on the ESXi host
- Check that the SSH private key is correctly stored in the
esxi-ssh-keysecret - Ensure network connectivity between vJailbreak and ESXi host on port 22
Storage Array Connection Failed
Symptoms:
Error: failed to connect to storage array: authentication failedSolutions:
-
Verify credentials in the Storage Management UI:
- Navigate to Storage Management
- Check the array credentials are correct
- Re-enter credentials if needed
-
Test connectivity from vJailbreak to storage array:
- Ensure network connectivity on port 443 (HTTPS)
- Check firewall rules between vJailbreak and storage array
- Verify API access is enabled on the array
-
Check array-specific requirements:
- Pure Storage: Ensure API token or username/password has sufficient permissions
- NetApp: Verify ONTAP management interface is accessible
ESXi Device Not Found
Symptoms:
Error: timeout waiting for device naa.624a9370... to appear on ESXi hostSolutions:
-
Verify iSCSI initiator is configured on ESXi:
- Log into ESXi via SSH
- Run:
esxcli iscsi adapter list - Ensure iSCSI software adapter is enabled
-
Check network connectivity from ESXi to storage array:
- Verify ESXi can reach storage array management IP
- Check iSCSI network configuration
- Verify VLAN/network segmentation allows iSCSI traffic
-
Manually rescan storage:
Terminal window esxcli storage core adapter rescan --allesxcli storage core device list | grep naa.624a9370 -
Verify LUN masking/mapping on the storage array:
- Check initiator group includes ESXi IQN
- Verify volume is mapped to the correct initiator group
- Check for iSCSI authentication issues (CHAP)
Cinder Manage Volume Failed
Symptoms:
Error: failed to manage existing volume: volume not found on backendSolutions:
-
Verify volume exists on the storage array:
- Check storage array management interface
- Confirm volume was created successfully
-
Check Cinder backend configuration:
- Verify Cinder services are running in PCD
- Ensure volume backend name matches ArrayCreds configuration
- Check that the Cinder host string is correct
-
Ensure volume naming matches backend expectations:
- Pure Storage: Volume name must match exactly
- NetApp: Full LUN path must be provided
-
Review Cinder logs for detailed errors:
- Check PCD Cinder volume service logs
- Look for backend connection issues
- Verify the
cinderHostfield in ArrayCreds matches a running Cinder service
vmkfstools Clone Failed
Symptoms:
Error: vmkfstools clone failed: Unable to create raw diskSolutions:
-
Check ESXi SSH connectivity and authentication:
- Verify SSH key is configured correctly in vJailbreak
- Test SSH connection manually
- Check ESXi SSH service is running
-
Verify vmkfstools is available:
Terminal window vmkfstools --version -
Check source VMDK accessibility:
Terminal window ls -lh /vmfs/volumes/<datastore>/<vm-name>/<disk>.vmdk -
Verify target device is visible:
Terminal window ls -lh /vmfs/devices/disks/naa.* -
Check ESXi host logs:
Terminal window tail -f /var/log/vmkernel.log -
Ensure sufficient free space on ESXi:
- RDM descriptor files require space on the datastore
- Check datastore free space
Clone Progress Stalled
Symptoms:
Error: clone progress stalled - no update for 5 minutesSolutions:
-
Check storage array performance and load:
- Review array management interface for performance metrics
- Check for high I/O load or resource contention
- Verify no array-level issues or alerts
-
Verify ESXi storage adapter health:
Terminal window esxcli storage core adapter list -
Review vmkfstools process on ESXi: ps | grep vmkfstools ps -c | grep vmkfstools
- Check if process is still running- Look for any error indicators -
Check for network issues:
- Verify stable connectivity between ESXi and storage array
- Check for packet loss or latency issues
-
Consider increasing timeout settings:
- For very large disks, the operation may take longer than expected
- Monitor array performance to ensure copy is progressing
Checking ArrayCreds Status
You can check the status of your storage array credentials in the UI:
- Navigate to Storage Management
- Check the Credentials column - it should show “Valid” after successful configuration
- The system will display discovered datastores for each array
- Any validation errors will be shown in the status column
Best Practices
- Validate prerequisites first: Ensure all connectivity and credentials are working before starting migrations
- Schedule during maintenance windows: VMs must be powered off during copy
- Monitor array performance: Large migrations can impact array performance
- Use for large VMs: The setup overhead makes this most beneficial for VMs with large disks
- Batch similar VMs: Group VMs on the same datastore for efficient migrations